
The first two entries of this blog have been dedicated to the use of OpenAI’s API. After all, OpenAI, with the launch of its GPT models, has been the main responsible for the AI boom we are experiencing, and therefore it was the logical choice to start with. However, we will not limit our exploration to OpenAI models, especially now that there are so many accessible options to developers. In this entry, we will discuss Google’s Gemini models.
Gemini is a family of multimodal models (which means they have been trained to work with text, images, and sounds), of which three members have been announced so far.
- Gemini Ultra: The most powerful of all, and considered to be on a similar level to GPT 4. It has recently been made available for use through API, and it can also be used from the Gemini chat application with a subscription to Gemini Advanced.
- Gemini Pro: A somewhat less advanced model, comparable in level to GPT 3.5. Available via API, and in the free version of the chat application.
- Gemini nano: The smallest model in the family, designed to run on mobile devices.
The API key
As is the case for almost any API we want to use (AI or not), the first thing we’ll need is to get an API key to identify ourselves in our calls. In the case of Gemini, the first step is to create a Google account (if you don’t already have one), then go to Google AI Studio, accept the terms of service, and choose the “Get API key” option.
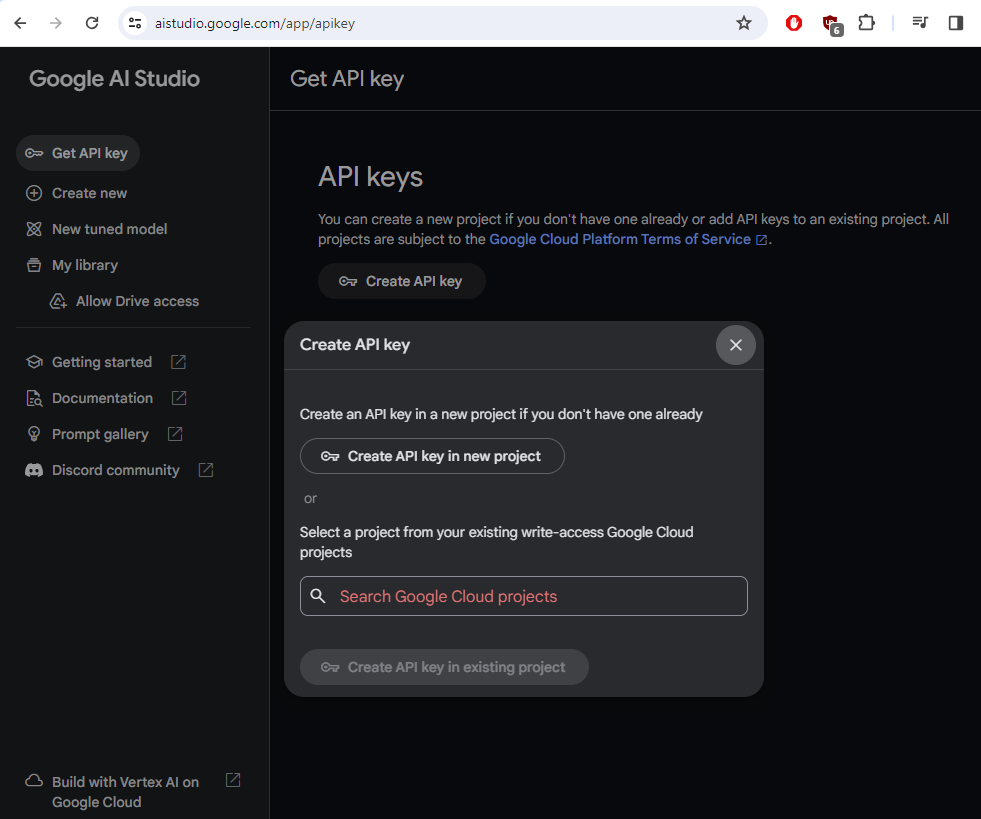
Google AI Studio is part of the Google Cloud ecosystem, and when going to create the key, it will ask us if we already have a Google Cloud project as part of which we want to create our key. If so, we can choose an existing project, but otherwise, it will suffice to select the “Create API in new project” option so that it generates our key in a new project. On the following screen, we will already have our generated key that we can use to call the Gemini API.
It’s worth mentioning that Google AI Studio is an interesting tool that is definitely worth tinkering with for a while, as it allows us to play visually with the parameters of the model calls and test our calls interactively.
Unlike what we had to do with OpenAI, in this case, we will not need to make any payments to Google to be able to make basic calls to the API, and we won’t even need to set up any form of payment. Google allows free calls to Gemini PRO, with a limit of 60 calls per minute.
Let’s test our API key by making a curl call to obtain the list of available models:
curl https://generativelanguage.googleapis.com/v1beta/models?key=api-keyIf everything has gone well, we will receive a list with the models that Google currently makes available to us, for example this one, which is the one we are going to use.
{
      "name": "models/gemini-pro",
      "version": "001",
      "displayName": "Gemini 1.0 Pro",
      "description": "The best model for scaling across a wide range of tasks",
      "inputTokenLimit": 30720,
      "outputTokenLimit": 2048,
      "supportedGenerationMethods": [
        "generateContent",
        "countTokens"
      ],
      "temperature": 0.9,
      "topP": 1,
      "topK": 1
}
Grumpy chatbot with Gemini
To explore how to use Gemini’s API, we’ll start by re-implementing our old friend, the grumpy chatbot with Gemini. We’ll do this directly with streaming and token management, both functionalities also supported by the Gemini API. The complete code for the Python and Node.js versions can be found on GitHub.
Google provides libraries in multiple languages to access the Gemini API. The libraries for Python or Node.js are installed as follows:
Python
pip install -q -U google-generativeaiNode
npm install @google/generative-aiWith the library installed, we basically will need to call three services: instantiate the model, obtain the responses, and count tokens. We will see in detail how to do it.
Instantiate the model
The model is instantiated by invoking the GenerativeModel service, as shown in the following example in Python:
gemini = genai.GenerativeModel(model_name="gemini-pro",
            generation_config=generation_config,
            safety_settings=safety_settings)
The first parameter, model_name (model in the Node version), is the only mandatory one and is used to identify the model we want to instantiate. In this case, the Gemini Pro model that we saw earlier when getting the list of models.
The second parameter, generation_config, is used to adjust some model parameters and would look something like:
generation_config = {
    "candidate_count": 1,
    "max_output_tokens": 2048,
    "temperature": 0.9,
    "top_p": 1,
    "top_k": 1,
}
The parameters temperature, top_p, and top_k are useful for adjusting how predictable or creative the model’s response will be; in a future entry, we will see in more detail what exactly these parameters mean and how to adjust them. Candidate_count currently does not allow values other than 1, but the idea (perhaps in the future) is that it could be used to ask the model to generate several candidate responses. Max_output_tokens can be used to limit the maximum number of tokens in the response.
Finally, the safety_settings parameter allows us to modify the security configurations that are included in the model, which can let us filter (or not) dangerous or explicit content. For example, if we wanted to remove all safety controls and allow any type of content, we could use the following configuration:
safety_settings = [
    {
        "category": "HARM_CATEGORY_HARASSMENT",
        "threshold": "BLOCK_NONE"
    },
    {
        "category": "HARM_CATEGORY_HATE_SPEECH",
        "threshold": "BLOCK_NONE"
    },
    {
        "category": "HARM_CATEGORY_SEXUALLY_EXPLICIT",
        "threshold": "BLOCK_NONE"
    },
    {
        "category": "HARM_CATEGORY_DANGEROUS_CONTENT",
        "threshold": "BLOCK_NONE"
    },
]
Get the model’s response
Similar to the chat completions service for the OpenAI API, Gemini API’s generateContent service is the one we will use to send messages to the model and get responses. The operating principle is the same: in conversations, we must send the complete history of the conversation up to that point, since each call is independent and has no memory.
The only mandatory input parameter is a list of messages containing the entire conversation history up to that point. As in OpenAI’s API, each message is marked by a role parameter indicating whether it was originated by the user or by the model. Unlike OpenAI, however, Gemini only understands two roles: user and model; it does not have a third role comparable to OpenAI’s system, which would allow us to provide additional context to the conversation. With Gemini, the only way we will be able to give some context to the model is by inserting a fictitious message exchange between user and model before starting. As an example, this is how we will initialize the list of messages to provide context about the behavior we expect from the model, in Python:
messages = [{'role':'user', 'parts': ['You\'re an old grumpy ... etc']},
            {'role':'model', 'parts': ['OK']}]
The object format of each message in Node is a little different. The way to do the same initialization in Node.js would be:
let messages = [
 { 'role': 'user', 'parts': [{ 'text': 'You\'re an old grumpy ... etc' }]},
 { 'role': 'model', 'parts': [{ 'text': 'OK' }]}
];
We send the list of messages to the generateContent service to get the response. Additionally, if we want to stream the response, in Node there are two different services, generateContent and generateContentStream, with and without streaming, whereas in Python we pass the Stream parameter as True to the service to enable streaming.
response = gemini.generate_content(mensajes, stream=True)Specifically for use in chats, libraries have other services called start_chat and send_message (startChat and sendMessage in Node) that simplify the task, since they automatically manage the history, but they end up executing calls to the generateContent service of the API. For the examples in this post, I have preferred to use the generateContent service directly.
Counting tokens
The Gemini API includes a service for counting tokens, unlike OpenAI, where we use an external library (tiktoken) to count tokens. This service receives a list of messages as input in the same format in which they are sent to generateContent.
For example, the way to count the tokens of the last two messages in Python would be:
gemini.count_tokens(messages[-2:]).total_tokensAs countTokens is a call to the API rather than a calculation performed locally by a library, to save network operations, in the code of the grumpy chatbot I have chosen to make a single call to obtain the tokens from the last exchange (question and answer) at once.
GPT vs Gemini
Now that we have seen how to use the Gemini API, and with the knowledge we already had on doing the same with OpenAI, let’s bring everything together and have the two models debate!
Clearly influenced by the American presidential elections taking place this year, I have chosen to assign GPT the role of Democratic presidential candidate, and Gemini that of the Republican, and to send them to discuss healthcare.
The complete code in Python and Node.js can be found on GitHub, but the idea is the same as in a chat application, with the difference that instead of having user input capture, the output message from each model will serve as input for the other. At a high level what the code will do is:
- Instantiate both models and initialize them in a similar way, explaining that they are participating in a debate and the role they should play. For OpenAI, we use a message with a system role, whereas with Gemini we’ll do it with a response message as we have previously explained in this entry. We will maintain two separate message lists, one for each model.
- We begin by summoning the model for one of them (in this case, GPT), capture the output and insert it into the list of GPT messages with the assistant role, and into the Gemini list with the user role.
- We invoke Gemini with their message list, and we save the output, again in both lists, but with the roles reversed.
- Iterate the desired number of times.
To simplify, I have chosen not to include any control of the number of tokens and limited the number of iterations to 5.